When Alc Stove building, A big question is...Side Burner or Top Burner. Here's a top burner build. It is definitely not the only way, or the easiest, or the best way to build an Alc minimalist camp stove. There are at least a hundred variations out there. You can spend hours on youtube watching Alc stove builds.
Watch this small stove bloom into a hot flame.
I prefer a top burning Alcohol stoves over side burning stoves because top burners burn with less problems. The top burner starts heating your pan the moment that you light it, even before it has bloomed.
A positive for a side burner, you can set your pan on top of a side burner without any pot stand. That's their only advantage.
I could go on and on about the differences, but this album is about one way to build a top burning stove from a 2.312" dia mid sizes drink can.

That's the full burn size of this 2.312" Dia stove that we are about to build. Note the small liquor bottle as a way to take 1.5 ounces of Alc with you for a day's cooking. Any bottle used for denatured alcohol must have poison designated on the bottle so that no one drinks it.
Let me caution you that using an Alcohol stove carries some danger with it. Always use your stove on a surface where spilled burning Alcohol won't damage anything. Never use it in your house. Remember that you can't see the flame in daylight.

Here's the burn pattern of this stove and it blooms in about 15 seconds, and will burn for over 11 minute using an ounce of 100% ethyl or methyl alcohol.

If you put a top cover 'governor' on this stove it will burn at this simmer rate for over 2 hrs on 2 ounces of fuel. Top covers can also be made from any soda can bottom that fits over the top that forces all the fumes out the single large top hole.
That simmer flame makes it possible to cook rice or beans that take a long time.
The same principle will work on a side burning stove if the top cover goes all the way to the bottom of the stove and seals at the base of the stove. Different size holes produce different sized simmer flames.

Lets get into the build using this soda can size that's just less than a 12 oz soda in diameter....at actually 2.312". This stove can hold 3 ounces of Alcohol.

First I rough cut the can in half. I'll use both halves.

I don't spend much time making that top rim of the bottom half perfect, it get cut again later. Notice the beveled bottom. That bevel is a little bit of a problem. The inner pressure wall needs to go to the very bottom of this outside can and that bevel has to be allowed for.

These stoves require 2 pieces, and outside can and an inner wall that make a chamber next to the can's wall where fumes can develope and be shot out into the oxygen where the fumes burn. I cut the top can off just below the top rim with a knife and then use that top half of the can to make the inner pressure wall. A fine tooth hacksaw blade can also be used.

After removing the top, I cut the can down to 1.5" tall. This cut should be as precise as you can make it. Personally, I just eyeball the flatness of that cut edge. If you're new to building stoves you should cut to a scribes line.

That right hand side goes into the left can bottom. The right side needs to be cut vertically and overlapped and super glued at the overlap so that the bottom fits down into the lowest part of the left hand can. There should be roughly 3/32s to an 1/8" between the inside and outside walls of these 2 parts.

Note the overlapped and superglued seam. It's now ready to go inside the outside can to make a double wall.

After the vertical cut and overlap and super glue job, I end up with a diameter that is small enough to go inside the outside (bottom half) can.

Now I'm ready to bend multiple flanges on the inside wall outward to fit the outside wall. That will complete the pressure chamber.

Now I scribe a line around the top roughly an 1/8" down the side from the top. That scribe size from the top depends on your space between the 2 walls
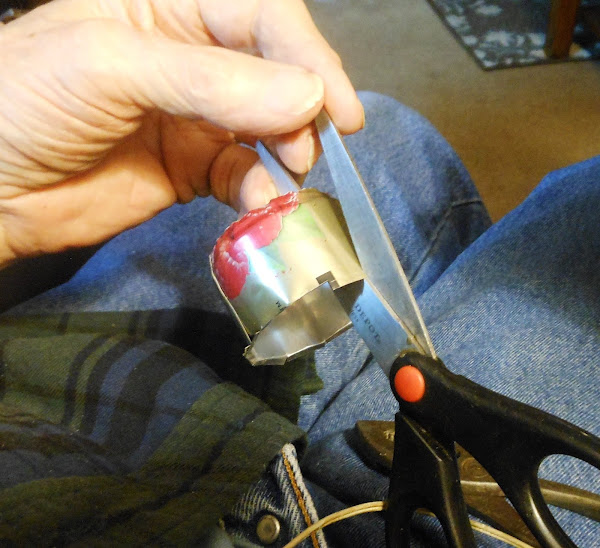
I cut down to a tiny bit passed the scribe line multiple times around the top with a distance apart from one another so that a normal pair of pliers will fit between the cuts.

shows the Size of the scissor cut down to the scribe line. Also you can see some of the bent flanges.

Pliers clamp down at the scribe line and bend the Aluminum outward 90*.

Now those flanges are ready to be filed to fit to the outside can's ID.

It will take 10 or 15 minutes to file those corners down to make a nice circle to fit the outside can. The thin metal files fast and the time depends on your 2 wall's gap and how well you picked a scribe distance. I've gotten good at it. Even so, I screw up and have to start over with a new can once in a while.

That becomes a fairly nice circle at the outside of the flanges.

Voila, we have a fit. It's important for the inside wall to get all the way to the bottom or you will have an incomplete pressure burn that comes out the holes. That means that the final Alc that is below the pressure wall will not burn out the jets at the top for 30 seconds or so before all the fuel is burned and the fire goes out.

After the fit, then the outside can is cut down to within 1/16" of the flanges. The stove will work at this point, but I choose to seal the flanges at the outside can with 24 hr JB Weld, being careful not to block any of the many burn slits. A toothpick works great for this.


20 minutes of 200* heat will cure 24 hr JB Weld completely. Without heat curing will take all night (even though, they say 24 hrs).

I heat my stove/JB Weld on an electric stove burner at low level 2.

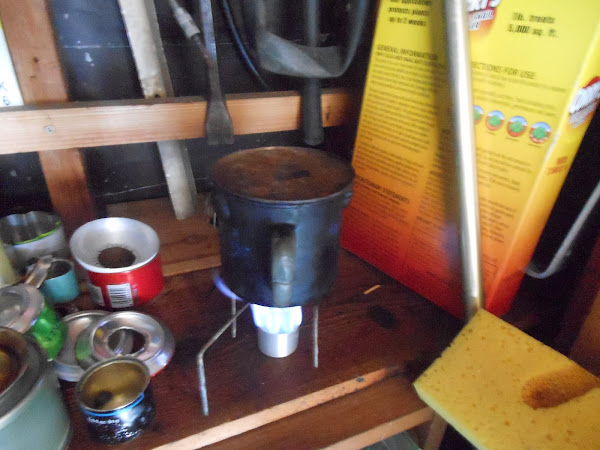
So lets cook some pinto beans now that we have the stove built.

I'm cooking a one serving (1/2 cup) size of pinto beans with this 2.312" Alcohol stove this morning. They are starting out dry so it will take 2 hrs of simmering. If I had soaked them overnight it would take an hr less.

It takes a little over 3 times the water or 1.75 cups to cook them in. Don't let the water get below the top of the beans.

If I have more light in my test room, you won't be able to see the fire very well. The beans are being brought to a boil before I put on the simmer top.

After the beans came to a boil, I put that white simmer top over the stove and simmered the beans for 2 hrs. Be sure to have a top on the beans.

After 2 hrs of simmering these beans are soft enough that I could smash them into refried beans if I preferred them that way. I'm going to make chili with them.

There's my chili. That half cup of beans made twice this amount of chili. I added a 1/4 lb of Hamburger, a 1/2 cup of tomato sauce, a 1/4 cup of tomato paste, as well as beef boulion, garlic powder, dried onions, chili pepper, and some additional water to complete the meal.

That's as hot as that stove gets without the simmer top. That cooking vessel is a 2 chambered SS vessel/glass. I cut the bottom away so that I could get heat to the bottom of the part that holds what I'm cooking. The good part is that there is a wind deflector for the inside cooking part. ...............................................................
Let's talk about some different Alcohol stoves and what makes them work. First is the warmer they are the more they generate the fumes that do the actual burning.
For instance, if you put 2 stoves side by side close, each stove gains a little heat from the other and the 2 together will burn hotter than the sum of the 2 stoves if they are a foot apart from each other.
And a stove burns hotter on a hot day, as well, they burn hotter if your wind screen prevent outside cooling. For these reason, you have to learn your stove and how to cook with them.
Cooking with an Alc stove becomes an art if you get good at it. I enjoy the challenge. Some folks like a stove that can just be turned on, though, imagine that. No, really. LOL
Here are a few stoves to look at and some features that they have. It has burn jets in that JB Weld dark rim arond the top that are hard to see.

This stove is made from a Vienna Sausage can. It has ribs that make it stiffer and holds it's roundness. Plus it has a flat bottom that makes it easy to get the inside pressure wall to seal against the bottom.

Also the flat bottom makes the stove more stable and less likely to spill its Alcohol. This stove has a section of soda can around the outside which makes it even more stable and it insulates from the wind so it will burn a little hotter than without it. It's better at altitude or in cold weather. Both those things inhibit Alcohol stoves.
Next stove...

This is a soda can stove that used the angle at the top of the can to make the inside pressure wall to get down to the bottom.

Note the bevel at the bottom. That makes the pressure wall difficult to get to the bottom, plus it makes the stove a bit unstable.
Next Stove...

I thought that making 2 stoves in one would be a good idea. It was a little hotter but not enough for the effort. I even made one that had 3 stoves. Everyone is nuts about something. :)
Next stove...

This a a smaller stove made from a 1.75" Dia hair spray bottle. The Aluminum a so much thicker and the Al is maluable. Also the bottom is flatish so the pressure wall can get down to the bottom easily. The thicker aluminum makes and pressure spray bottle stove stronger.

Note the shape of the bottom..all pressure spray bottles are that shape.
Next stove...

I found this bottle today. It's a pressure bottle with a screw top. I've never seen one like it before. I'll use about 1.5" of the top as the inside pressure wall.

I'll flare the 1.5" top piece so that the flare reaches the ID of the bottom can.

I swage the maliable rim over the edge of a board with the round edge of a kitchen knife handle to make a rim to drill jets into for the pressure chamber.

Now the rim of the inside can nearly fits the outside can. It's a little larger. It needs to be carefully edge filed until the inside fits the outside.

Now that the inside fits tightly into the bottom outside can, it is ready to have eight outside jets drilled in the rim with a large needle in a hand drill.

Let's light this stove for a test.
That's a nice burn size. Those jet flames are all the same size at about an inch high. Drilling with a needle in soft Aluminum is ideal.
Next stove...

Next stove...


Next stove...

An even smaller 1.125" stove can be built. This one will burn for 8 minutes and heat a large cup of coffee hot enough to burn your lips in 6 miunte plus, and it can be carried in a front pants pocket. It hardly gets any better than that.........
Good luck out there....
Comments
Post a Comment